Showing posts with label upcycled. Show all posts

Tuesday, January 3, 2012

Upcycled Entertainment Center Turned Play Kitchen

When the Stink Bug was first born, I looked into the cost of an all wooden, Waldorf style, play kitchen and was SHOCKED at the prices that I found. I looked into plastic play kitchens, and was more than a little turned off by the cost, and more importantly the look. So, in the end, I turned to DIY tutorials. I had seen quite a few cute, upcycled, play kitchen blog posts floating around and figured that I could do it myself with a little bit of elbow grease and some creativity.

The first step was finding an entertainment center for cheap (or free). I decided that I would be ok spending a little bit so, I check out Craig's List and was happy to find this little number for $35. Here is the model that I found. There wasn't a scratch on it! That didn't last long....


I took off all of the hardware and the doors to make my job a bit easier. Then, I set out to do some sanding -every nook and cranny that was going to be painted! This is super duper important to make sure that all of your paint adheres well and looks great!


Then, I primed all of the areas that I wanted to paint. If you want to leave any areas white (like the inside) I suggest painting two coats so that it looks nice and even.


This is a good time to cut any extra pieces of wood that you might need and prime them as well. I wanted to have refrigerator doors, as well as an oven door so, I found some scraps, and went to town priming. Then, while your doors and hardware are off, go head and paint everything that needs to be painted with its finial color. It is much easier to do while everything is dissembled.


You may also find that you need some extra hardware for your new doors, look to see what you can find around your house or check out what you can find on clearance at your local hardware store!


My favorite part of the whole project was getting to be creative with the decorations and fixtures. I collected knobs, shelves, hooks, and other great odds and ends that really made the kitchen fun. There were a few projects (like drapes) that I didn't get accomplished because I ran out of time (this was a Christmas gift for the Stink Bug). I may go back and add those at a later time.

I also filled her kitchen with some recycled items from our own kitchen. Here are a few spice containers filled with colored paper.


A little "mommy made" touch, which should look more like a window when I get the drapes made!


Some burners, painted on, and then I stuck a piece of clear vinyl over them to make them look like a glass top range. This picture doesn't look so great but, it added a nice look.


I kept the side of the kitchen unpainted so that I can use it for storage of some of the Stink Bugs toys. At some point I am sure these little baskets will be filled with play food and "pantry" items. I also kept the top and other side unpainted because I like that it still looks a bit like a piece of furniture in my living room. I imagine that I could put a little drape or tension rod across the front of it when company comes over if I really wanted to "hide" it.


Here is the finished kitchen on Christmas morning! We put her gifts around the kitchen, instead of our tree! Many of her presents were things to go with the kitchen. An apron, pots, and play food to name a few!


A nice height for the Stink Bug, even as young as she is.


Don't forget to wash the lettuce!

Saturday, December 17, 2011

Upcycled Sweater Toddler Dress

Upcycled Sweater Toddler Dress

Have an old turtle neck or sweater that you just don't like anymore? Or, one that just never fit right? I sure do! Matter of fact, this sweater fit into that second category. It was a bit too broad in the shoulders and left me feeling like a line backer. I think I may have worn it a handful of times but, I could not manage to get it OUT of my closet! The fabric was just too nice to part with it. So, I decided to upcycle it into a Christmas dress for my Stink Bug!

Upcycled Sweater Toddler Dress


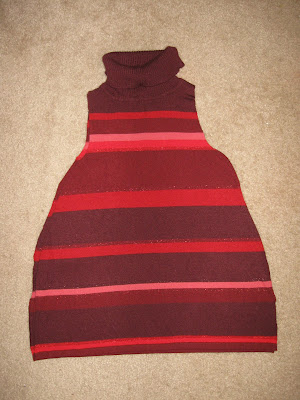
I started by finding a dress, which already fits my Sting Bug, and laying it over top of the sweater to use as a pattern. Now, some people might prefer to trace the dress onto paper to then use as a pattern but, not me! I had one nap time to make this dress as well as one for Thanksgiving. (You can check out the other dress here.)

Upcycled Sweater Toddler Dress


Using the body of the dress as a guide, I cut up the sides of the sweater. I wanted to use the turtle neck part of the sweater (it was a tight fitting on me) for the Stink Bug as well. You can see it really was a very general outline. It looks a little funky on the right side but trust me, it all came out fine once I sewed it! You'll see!

Upcycled Sweater Toddler Dress


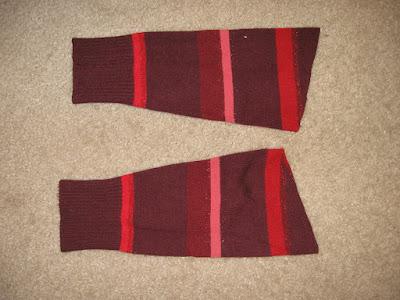
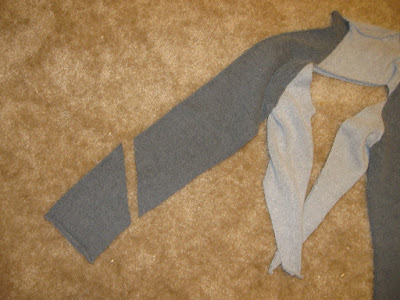
I also decided to salvage the sleeves, using the cuff's to my advantage. Be sure to cut at an angle so that you don't have bunching under the arms of the sleeves.


Upcycled Sweater Toddler Dress


With the dress inside out sew up the sides of the dress, being sure to leave room to add the sleeves. Once the sides are sewn, add the sleeves. You can check out how to add the sleeves on my other dress tutorial here.

Upcycled Sweater Toddler Dress

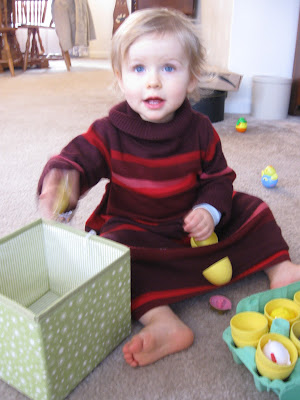
Try your dress on your little one, and make any changes accordingly! (The Stink Bug was trying her dress on over the clothes that she was wearing that day. The dress looks a bit bulky because of this.) You can bunch the turtle neck up if you like that look, or you can fold it over. (It is folded in the next picture.) If your turtle neck is way to big for your tot then, fold it like a cowl neck!

Upcycled Sweater Toddler Dress


Here she is standing up in her dress so you can get an idea of what the whole length of the sweater looks like. You can very easily hem the dress shorter, or just take the length into account when you trance the dress initially. I really like the length of the dress for the winter, and it does not trip the Stink Bug up!

Upcycled Sweater Toddler Dress


I bet you can make one in a nap time too! If you do, I would LOVE to see what you come up with!

Check out another toddler sweater dress that I sewed here!

Monday, November 28, 2011

Upcycled Sweater Toddler Dress 2

Upcycled Sweater Toddler Dress


Upcycled Sweater Toddler Dress 2

With Thanksgiving quickly approaching, I needed a new semi-casual dress for my Stink Bug to wear for our family get together. I really didn't want to go out and buy anything new so, I started digging around in my closet for some old sweaters that I was no longer wearing. I tend to have a pile of those hanging around.

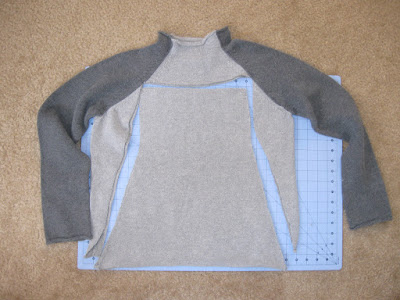
This particular sweater no longer fit me well but, was in good shape. To get the main body pieces of the dress, I laid another dress (which currently fits my daughter) on top of my sweater. I cut around it, making sure to leave enough room for seam allowances. I only cut out the body sections here.

Upcycled Sweater Toddler Dress


After that, I eye balled, and cut the length that I wanted her sleeves to be. Once again, being sure to leave enough room for seam allowances. I wanted to use the "curl" of the cuff so, I cut from the bottom of the sleeve. Less sewing for me! YAY!


Upcycled Sweater Toddler Dress


With the body of the dress inside out, and the sleeve RIGHT side out, I tucked the sleeve in and pinned it. If you are unsure of whether or not your sleeve has the correct side out, pin it and turn the whole dress right side out. You will quickly see if you have it done correctly. Better safe, than have to spend your time seam ripping, and fixing! Go head and sew the sleeves as well as the sides of the dress.


Upcycled Sweater Toddler Dress


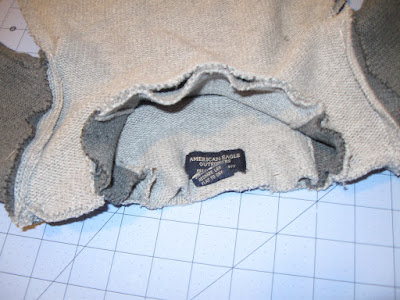
Next, I eye balled how much of the neck of the sweater I wanted to use, and cut it. I wanted the neck to be somewhat large on the Stink Bug. (She has a larger head and HATES to have things pulled over it!) I thought it would add to the over all look as well. You may not like this look, by all means, change away!


Upcycled Sweater Toddler Dress


Here is the neck, over the body of the dress.


Upcycled Sweater Toddler Dress


I wanted to give the neckline a little bit more room, and shape so I cut out the front of the neckline a little bit deeper than the back.


Upcycled Sweater Toddler Dress


Turn the dress inside out, if it isn't already, and the neck piece right side out. Pin together, just as you did with the sleeves. Check as before. Sew all the way around the neck once you have checked!


Upcycled Sweater Toddler Dress


Turn your dress right side out and check your work!


Upcycled Sweater Toddler Dress


Add some embellishments if you like. I used some of the left over sleeve fabric to add a little star. I zig-zag stitched around the edges to sew it onto the front of the dress.


Upcycled Sweater Toddler Dress


Here is the cute owner of the dress, my Stink Bug! I made sure to leave her lots of room to wear it through the rest of the winter! I paired it with some cute leggings, and she was ready for Thanksgiving.


Upcycled Sweater Toddler Dress


My model was ready to be finished, and did not want her picture taken ANYMORE! Unfortunately, this sad picture was the only one that I got of her standing up. I am sorry Stink Bug!


Upcycled Sweater Toddler Dress


For you busy moms who are thinking, "Who has the time?!" I completed the dress, as well as one for Christmas, in one nap time. (Check out the other dress .) Which for my Stink Bug, was right at an hour. I even took pictures! I am sure you can do it in a nap time too!

Tuesday, September 6, 2011

Upcycled Sweater Mittens


I just can't get enough of upcycling my old clothes. Especially well loved sweaters that I just can't seem to throw away. This specific sweater has the sweetest buttons all the way down the front. I just love it! The problem? There is a MAJOR, fist sized, hole right in the front of it. No matter how I look at fixing it, I know it will be noticeable. So, it has spent the last 6 months just sitting, waiting, to be thrown out. I finally sat down today, and decided to do something with it (thank you nap time). I decided to made some mittens, since the sweater is 100% wool. I will be making something else too but you'll have to keep an eye out for that in another tutorial!


I decided to use the cuffs on the sleeves to my advantage.


Start by using your own hand (or your child's hand) as a guide for where to cut your sleeve. Be sure to leave yourself lots of extra room!


Cut straight across the sleeve, all the way through.


Turn the sleeve inside out.


Place your hand (or your models) on the sleeve, and use it as a guide to make a mitten shape. You can trace, and then cut, or just cut around your hand. Be sure to leave plenty of room for sewing or surging.


Repeat with the other sleeve to make a second mitten. I know that it looks like I made two of the same mitten here but, they are identical on both sides so, It really doesn't matter. Either mitten can be used for either hand. Sew or serge around each mitten, and then turn right side out.


I love the buttons on this sweater so, I just HAD to recycle them! I snipped off four buttons, two for each mitten.


I hand stitched two buttons onto the "cuff" of each mitten.


Here are my mittens, all ready for some cold weather! Just in time too! This past week the daytime temperature in Ohio went from 100+ degrees down to the mid 60's! It wont be long before we pull out the jackets and mittens! I am sure you will want some upcycled mittens too!Have fun!

Sunday, August 21, 2011

Old Sweater Fingerless Gloves

Have an old wool sweater that your not sure what do to with but, can't stand to throw it away? Make some fingerless gloves!


Old Sweater Fingerless Gloves


Old Sweater Fingerless Gloves

Old Sweater Fingerless Gloves

Related Posts Plugin for WordPress, Blogger...