Sunday, August 28, 2011

Tot School: 12.5 mo

Tot School
~12.5 months~

The Stink Bug has had a great first week of tot school! I am so impressed with how well she has done. I was a little bit worried about how a couple of the activities would hold her attention but, she surprised me and concentrated on each activity for a good 5 minutes straight! I am sure every week wont be like this but, it was a great "first week" of school!

Since the weather has been so nice here this week, the Stink Bug and I spent lots of time outside. We played with her water table (sorry no pictures of this one yet) and had fun chasing bubbles around the yard. When it came time for our tot school, I decided to take school outside, (I just love the flexibility of being at home!!)and I brought out the tot trays, with each activity on it!

The first activity that I had for the Stink Bug was a washed out oatmeal container with the label pealed off and a hole cut in the lid. I made the hole just barely larger than some of her favorite balls.


I poured the balls out onto the tray and modeled how to put each of the balls into the container. The Stink Bug caught on quickly and put the rest in herself with to trouble!


This turned out to be a great gross motor activity as she squatted and stood to put each ball into the container.


For the next activity, I found two old Easter eggs (great for LOTS of other activities) that were identical, and filled each one with a different sounding object. In one, I put a handful of rice. It made a nice light "swooshing" sound. In the other one, I put a handful of large glass bead. This egg made a louder "cer-chunking" sound. The second egg was also much heavier. The point to me was just to have each one sound, and feel different. I did not glue or tape the eggs shut so, I had to be super careful to watch that she did not open then eggs and put the contents in her mouth. If you are concerned about potential choking hazards, just be sure to tape yours closed! (The Stink Bug is slowing learning what not to put in her mouth but, you can see she is putting some grass in her mouth in this shot!)

The objective of this activity was for the Stink Bug to explore each of the sounds and weights. I did not expect her to be able to compare or contrast the sounds (great for an older tot though). I just wanted to her be able to explore them for what they were!


She loved shaking each of the eggs! At one point she picked them both up, shaking all the while, and carried them across the yard! Silly girl!


The third activity that I had planned for the Stink Bug was a beginning transferring/pouring activity. I used an old laundry detergent scoop as the container, and painted the bottom of the inside with red paint. (I made one of each rainbow color when I made this one. That way they can be used for future color sorting activities.) I found four red pom-poms to match (I also have rainbow colored pom-poms to match the cups. Look for theses in future posts!)


I showed the Stink Bug how to pick up each of the pom-poms and put them into the cup. She did not have any trouble putting them in the cup but, she did have trouble keeping them in. She wanted to hold the cup while she put the pom-poms in but, would often spill what she had already put in the cup. What started out as an activity based on putting the pom-poms in and out of the cup soon turned into a lesson on how to hold a cup to keep it from tipping. She will need much more practice in this area!


We had a great first week of school, now to come up with some activities for next week!

Saturday, August 27, 2011

Ash Tree Meadow Featured!

Reduce, Reuse, Upcycle


I was honored to be featured over at Reduce, Reuse, Upcycle today! Go check it out here! This is an awesome blog for you crafty, recycling folks! Thanks Rachel Sue!

Contact, Sponsor, Feature or Guest Post

Contact, Sponsor, Feature or Guest Post

Contact:
I am excited to hear from YOU in blog land! I am always willing to answer questions the best that I can and I am always excited to hear feedback--from YOU! Email me at AshTreeMeadowOnline(at)gmail(dot)com

Sponsor, Feature or Guest Post:

I would love to get to know you better and let my blog friends get to know you better too! Contact me if you would like to be featured here on my blog!

I would LOVE to highlight your "products" by doing a giveaway for my followers. No charge to you, just as long as my followers have a chance to win something great! Or if you have something else in mind, just let me know, I am open to suggestions! I do have space on my sidebar for your great ad!

Do you have a DIY project, tutorial, or before & after photos including:

* Reused, Recycled, Upcycled, Arts, Crafts, or Sewing Projects?
* Organization Tips, Home Decor, or Home Remodel?
* Tot School, Homeschool, or Montessori?


Please e-mail me AshTreeMeadowOnline(at)gmail(dot)com
Please include the following:

* Your Name
* Your E-mail
* Blog Name
* Blog Web Address
* Project(s) Title
* Direct link to your Projects URL


If your project is featured I ask that you include my "I was featured..." button somewhere on your blog.


I can't wait to hear from you!

Ashley

AshTreeMeadowOnline(at)gmail(dot)com

Friday, August 26, 2011

Emmeline Apron


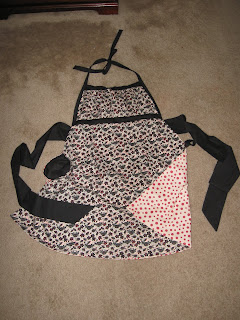
I can't say enough about this apron! It is cute, it is functional, and it is REVERSIBLE! I have made it a total of five times now and every time I make it I love it more and more! I seem to add a new "extra" to it each time as well. This particular apron has an added pocket (shown open and in black on the left side) and a dish towel loop (black loop on the right side). I think the next time around I will add a few pockets to the front, as well as hidden in the sides!

Emmeline Apron

Emmeline Apron

Here is another apron I made from this pattern with a cherry motif! (Sorry about the quality of the pictures! I PROMISE they will get better!)


You can find the pattern from Sew Liberated here!


No, I am not being paid to say such nice things about Sew Liberated! I just really enjoy this pattern!


Wednesday, August 24, 2011

Tot School

Tot School


~12 Months Old~


It is the time of year for school to start! I love hearing the excitement that many of my friends have as they get their children ready for the first day of school. Whether its their children's first day of kindergarten, or first day of jr high, the air of excitement is still the same! This fall, I get to share in a little bit of the excitement too. I will be starting Tot School with the Stink Bug!

Now obviously, her school schedule will not be ANYTHING like kindergarten, or preschool for that matter. I hope to have around 15-20 minutes of guided "school" time. It may not be all at once either. It may be 5 minutes here and there throughout the day. I plan on following her lead. The main objective is for me to have three new activities for her to participate in each week. If she is bored with them sooner, I will swap them out accordingly.

The learning technique that I will use will be based on the Montessori method. If you are not sure about what that is, check out my previous post on it here. Also, a mixture of the "tot trays" method found here. To begin with I plan on setting out three trays, each with their own activity, chosen to challenge the Stink Bug but not frustrate her.

Each week, I will do my best to take pictures and write a little bit about what we are working on. I will also be linking up weekly with Tot School from the blog 1+1+1=1. You can check out what other moms are doing with their tots and some linky love!

Wish us luck!

Old Shirt Toddler Dress

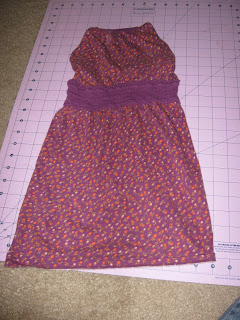
I had an old shirt laying around that didn't quite fit. I thought that the band around the chest of the shirt was a nice embellishment but, just not flattering on me. In the end I decided that I would make a much better dress for the Stink Bug!

Old Shirt Toddler Dress

I cut out the front panel of the shirt, cutting the arms of the shirt off just before the seams. I made sure to keep the knit neckline intact to use as straps.


Old Shirt Toddler Dress

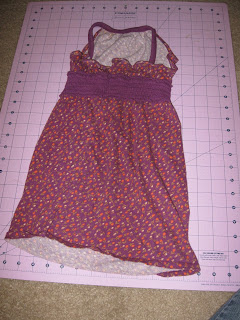
I brought the straps around to the back and sewed them at the old waistband. I made sure to try the dress on the Stink Bug before choosing the strap placement and length. Then I just marked where the needed to go while she had the dress on.

Old Shirt Toddler Dress

Old Shirt Toddler Dress


Tuesday, August 23, 2011

1, 2, 3, Montessori!


I have a great resource to share with you! It is a new addition to the wonderful website 1+1+1=1. It is called the Montessori Minute and is a guest posting written by John Bowman, author of the book Montessori at Home. (I have the e-book, found here, and can not sing more praises about! It is a great book to help you bring Montessori into your own home, and homeschooling environment! It also outlines the basic parts of Montessori learning and is a great way to "dive right it!" )

The Montessori Minuet posts are not your normal blog posts-but more like articles or even chapters from a book. They are posts filled with resources and ideas for you to come back to anytime. The posts are filled with ideas and information! Even lots of hand on, home made activities! Go check it out!

Sunday, August 21, 2011

Old Sweater Fingerless Gloves

Have an old wool sweater that your not sure what do to with but, can't stand to throw it away? Make some fingerless gloves!


Old Sweater Fingerless Gloves


Old Sweater Fingerless Gloves

Old Sweater Fingerless Gloves

Saturday, August 20, 2011

Pack-N-Play Storage

I was never sure where to store the bag that the Stink Bugs pack-n-play came in when I was using it. Or where to put all of the little odds and ends that I like to have near. You know, toys and blankets, that sort of thing. Here was my solution! (Just be sure to watch the ribbon with the little ones. I am sure you could use shorter ribbon, loops, or a velcro closure.)

Pillow case + ribbon = easy tie on storage! No more explanation needed!

 Pack-N-Play Storage

Monday, August 15, 2011

Comforter "Bean Bag" Chair: Tutorial

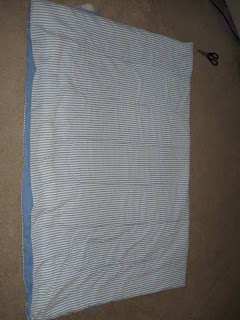
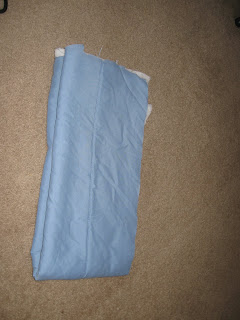
Step one: Find a twin comforter that you don't want/use/whatever!

comforter bean bag chair

(Hey, I know that this picture needs to be rotated but I have NO IDEA why it rotated this way! It looks "correct" on my PC but, I don't have any idea why blogger rotates it. Any help would be greatly appreciated!)

Step two: Fold in half "hamburger bun" not "hot dog" style. Cut along the fold so that you have two equal halves.


Step three: Fold into thirds, mark where the folds were, and cut through both halves at each mark.

comforter bean bag chair

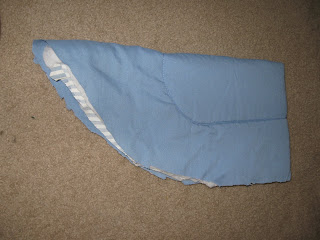
Step four: Take one of the rectangles (you should have six) and fold it in half. Then fold in half again.

comforter bean bag chair

Step five: Cut/round the open edge. Be sure not to cut the folded edge. Check out the next picture before you start cutting!

comforter bean bag chair

This is what it should look like after cutting/rounding. Repeat for all six rectangles.

comforter bean bag chair

Step six: Take two of your pieces, right sides together and sew from one "point" to the next "point." be sure to take into consideration which fabric you want to face out. My comforter was reversible so, I alternated which side faced out. When you are sewing, be sure to catch all of the layers, including batting, with the sewing machine.

comforter bean bag chair

Step seven: Add on anther piece, being sure to sew right sides together. Make sure that your "points" line up as closely as possible. Continue to add pieces. On the last piece, leave yourself about 5 or 6 inches open. You will want to be able to turn it right side out.

comforter bean bag chair


Step eight: Turn and fill with your desired stuffing. Foam, poly-fill,
bean bag beans, old blankets, or another comforter. It is up to you! Once filled, hand sew the opening closed that you used to turn it!

comforter bean bag chair

I still have to stuff mine so, here it is looking a little bit sad and deflated! ;-) I'll be sure to add a picture of it filled asap! Maybe even a few with the Stink Bug sitting on it looking at books although, she seems to already be fascinated with sitting on it without the stuffing!


Comforter "Bean Bag" Chair

Comforter Bean Bag Chair
I have had a huge desire lately to make a bean bag chair for the Stink Bug. I had nice visions of her sitting on one, looking through picture books. Unfortunately, those angelic visions are quickly dashed when I think of what cats do to vinyl type bean bags....(scratch, scratch)....and of course.... (hummm this looks like a nice place to use as a little box).... Not very angelic at all.

I decided that if I was going to make one, it would have to be made out of a washable soft fabric. Which is so much nicer to sit on anyways! I found many nice tutorials floating around to make some. Many for round cushion type seat, and even some with removable and washable out sides. I began to pine for all of them. Everything about them. Except, spending money to buy the heavy duty fabric in a nice print. I am cheap. What can I say.

So, I started looking around the house for fabrics that would be durable enough and were not being used currently. Oh, and a fabric that I could spare a few yards of. In the end I came across an old twin comforter that was reversible, and quilted. It was a comforter that I used back in college and has just hung around for someone to love it again. I thought that it would be PERFECT for a nice place to sit. So began a new sewing project. I set out to make an upcycled bean bag chair from and old comforter. Weird, and wonderful! Keep an eye out, I will try to upload the tutorial tonight or tomorrow!

Thursday, August 11, 2011

Letters to My Daughter: First Birthday


Dear Stink Bug,

As I sit and write this you have just turned one, and I am planning your birthday party for this weekend. I can not believe how fast a year has gone by. It makes me a little sad to see how big you have grown. At the same time, I am excited to see the changes in you each day. Kind of an unusual experience to miss the old and revel in the new at the same time.

Some things about you as you turn one:

You can say the words; "mama," "dada," "bird," "brush," "bow," "cheese," "this," "that," and sometimes I think you are saying "kitty cat."

You can sign the words; "cheese," "more," "banana," "cracker," "eat," "book," "hat," "ball," and sometimes "finished." You often sign "more" if you want my attention or are trying to communicate your needs.

You love to point at various objects and exclaim, "dis!?" Meaning that you want me to tell you what the name of the object is and often that you would like me let you touch it.

You follow many directions when asked. Some of them are; "come sit in my lap," "give me your hand," "lift up your legs," "go and read a book," "what is in your mouth," (followed by you opening your mouth and sticking out your tongue) "can I have that," "bring that to me," "give that to daddy/mommy," "chew your food," "dance," and there are many more.

These things may seem small but, you have come a long way from not being able to lift your head as a new born. I feel blessed to have been able to witness every small change in you, no matter how insignificant that it might seem. Here are a few more "small" facts about you right now;

You have eight teeth, and your first year molars are on the way in. You have been quite a fussy baby the last few days because of the discomfort.

You are becoming quite the pro at eating now. You would rather not eat ANYTHING purred but, mommy knows better. Some things just go down better that way, and easier. You are so independent, you would prefer to feed everything to yourself but, you don't know how to use a spoon or fork yet. For a typical lunch that you can feed yourself, you will eat lentils, butternut squash, pasta, and blueberries (chopped up of course). Dinners that you can feed yourself often include; peas, carrots, tofu, and pears. Oh and of course, you demand to have diced cheddar cheese at every meal! Silly baby, you are just like your mommy. She loves cheese too!

You have been walking since you were ten months old and you have become quite good at it. So much so that you occasionally think you can outrun me! Now you have begun to climb on your toys even!

Your hair is short and blonde. We have not given you a hair cut yet but, it is beginning to get in your eyes. Speaking of eyes, they are the prettiest shade of blue with a little bit of gold right in the center. Just like your daddy's. We hope that your eye color is here to stay now!

Here are some of your favorites;

food- cheese and bananas
animal- puppies and birds
drink- water
toy- my cell phone....
person- MOMMY! ;-)

You have the sweetest little personality. Very independent yet, you will share easily. You try to feed me your food and will gladly hand over your favorite toy when asked. You will concentrate on "reading" picture books to yourself for 15-20 min at a time if no one interrupts you. You have the cutest way of sticking out your tongue when you are concentrating. On the other hand, you have developed a new habit of shrieking, for the fun of it, that sends your daddys and my nerves on edge. We hope that you grow out of it quickly!

Your first birthday party will be a sock monkey theme. I spent a little bit of time designing a monkey that I think you will love! The monkey will be on your cupcakes, party hats, signs, bubbles, and a few other places for your birthday theme! The colors are pink and yellow. So fitting for a little girl right!? I hope that you enjoy your gifts. I made you a rug for your reading area (although you are just looking at picture books for now), two scarfs, and some mittens for this winter. You have a few other gifts from us as well. You will have to look at the pictures from the party to see what you received! I hope you have a wonderful time. Lots of the people you love, and who love you, will be there!

Love,
Mommy


1, 2, 3, Montessori!


I wanted to begin transitioning to Montessori style learning with my daughter (lovingly nick named named Stink Bug) for quite some time now. I really just didn't know where I wanted to start or felt like I really had the right materials. It was one of those situations where I had all of the information that I needed. I was just frozen and not able to move forward. Today, I decided was the day to start the transition into more concrete Montessori! For those of you unfamiliar with Montessori learning, here is a quick little definition by good old Wikipedia! (I know, I know, don't give me a hard time about my source. It was just very quick and concise.)

"Montessori education is an educational approach developed by Italian physician and educator Maria Montessori. Montessori education is practiced in an estimated 20,000 schools worldwide, serving children from birth to eighteen years old.

Montessori education is characterized by an emphasis on independence, freedom within limits, and respect for a child’s natural psychological development. Although a range of practices exists under the name "Montessori", the Association Montessori Internationale (AMI) and the American Montessori Society (AMS) cite these elements as essential:[2][3]

* Mixed age classrooms, with classrooms for children aged 2½ or 3 to 6 years old by far the most common
* Student choice of activity from within a prescribed range of options
* Uninterrupted blocks of work time
* A Constructivism (learning theory) or "discovery" model, where students learn concepts from working with materials, rather than by direct instruction
* Specialized educational materials developed by Montessori and her collaborators

In addition, many Montessori schools design their programs with reference to Montessori’s model of human development from her published works, and use pedagogy, lessons, and materials introduced in teacher training derived from courses presented by Montessori during her lifetime."


Now your a pro too! Ok, so there is a bit more to it than that but, that is enough to have a basic understanding of where I am coming from. I plan on using some Montessori elements with a blend of traditional education and a smattering of Waldorf. How you might ask? Well, I have it all floating around in my noggin somewhere. I just have to dig it out.

If you have stuck with me so far, you might be asking, "So where is this Montessori transition you are talking about!?" Well, I starting transitioning over the play area to incorporate the Montessori idea of a "prepared environment." To me, this means a space that is thought out ahead of time. The space contains a limited number of materials that are organized, each material has a specific location that it belongs, and the materials are chosen with the child's "sweet spot" for learning and development. Just difficult enough to be challenging but, not so difficult that the child becomes frustrated. The space should also be appealing to the child, with plenty of materials made from natural woods and fibers. Not just a giant toy box filled with plastic toys. (If you don't want to go digging through it, would a toddler?)

Although the Materials in our play area are not traditionally Montessori, I have chosen them with care. Being sure to rotate out materials that are no longer challenging or that she has become bored with. I think as time goes on I will begin to incorporate more Montessori materials, but not ONLY Montessori materials. As I add them I will be sure to blog about them, especially those that are DIY. I will share the printable that I make and will link them in my "Printables" section. For now, enjoy a picture of our new Montessori inspired space!


(Alright, I know. The picture stinks. I am working on it though! I hope to have a better camera soon!)

Wednesday, August 10, 2011

T-Shirt Rag Rug


Another neat DIY project that I have seen floating around is the T-Shirt Rag Rug. I especially like that this project is made out of recycled/up-cycled old t-shirts. I ALWAYS have a pile of t-shirt laying around that are holey, unloved, or just don't fit anymore. I can never bring myself to throw them out. I have a bad case of the "fix'n to do's." I am always "fix'n" to do something with all of my old clothes, random containers, papers, and well.... you get the idea. On occasion I have to make myself go through my "fix'n to do" project piles and throw everything out that I wont realistically get to in the next month or so. When I got to my pile of old t-shirts I realized that I was not likely to use up all of my t-shirts on singleton projects (like toddler knit shorts/gauchos- I'll try to do a post on this sometime). I figured that if I didn't want to trash them, then I had better find a way to use them all. Faced with throwing them out, I found a project.

I will keep the directions for this one short, sweet, and to the point.

For a rug about 3ft in diameter, you will need;

20 t-shirts in whichever colors you choose.
scissors and/or rottery cutter
coordinating thread (at least one spool)
a safety pin, or small clip
sewing machine

1.) Start by cutting all of your t-shirts into 1 1/2 to 2 inch strips. (I chose to make mine 1 1/2 inch because I like the look of a thinner braid.) You can choose to cut straight across the body of the shirt, or you can be fancy and cut in from alternating sides so that the shirt becomes one long strip. That is up to you. (I choose to cut mine straight across the shirt and then cut open each resulting "circle" that it made.)

2.) Once you have all of your t-shirts cut, (or enough to start braiding - you can always add more as you go) begin braiding then pieces together. I found that it was easiest to tie three strips of t-shirt together, and then clip it to the table top that I was working on. I think you could also safety pin it to your sock "friendship bracelet" style too. Once you have braided as far as you can with the strips you have, you need to add more strips. You can add more to the end by sewing on, braiding them in (my least suggested method), or adding with a couple of little cuts. I can show you the cuts best with a couple of pieces of paper. Once you have made the cuts, feed the new strip through the cut of the old strip and then feed the new strip through itself.


3.) Continue braiding all of your t-shirts together until you have a giant ball/mound of t-shirt braiding.

4.) Now you are ready to create your rug! (I know that some people hand stitch their rugs together...that sounds infinitely tedious to me. I decided to use my sewing machine instead.) Set your sewing machine to a zig zag stitch, on a wide stitch setting. Take your t-shirt braiding and create a little coil with the starting end. Kind of like a play-dough coil you made back in the day! Use your sewing machine to zig zag the coil together being sure to catch each side of the braid in it as you go. If you don't catch each side, you will end up with a hole in your rug, and will have to go back and fix it later. (I had many of these and had to go back to fix them in the end.)


5.) Continue sewing the coil larger and lager. Be sure to watch your machine tension as you go. If your tension is too tight, your rug will begin to cup and will look more like a bowl than a rug. If you have this problem (which I did) try feeding in more of the braiding, while keeping the rug snug and taught. (I found that I was constantly adjusting and checking my work.)


6.) Finishing the rug. When you get to the end of your braiding, cut your ends at an angle tapering towards the rug. Then, as you sew the last of the braid on, be sure to tuck the pieces tightly up against the side of the rug. Also be sure to back stitch a bit to make it more secure. (I had a little bit of cupping in my rug so, I got it wet, and let it dry in the sun. Once dry, the cupping was gone.) Voila! You have just made a T-shirt Rag Rug! Aren't you spiffy! :-)


Tuesday, August 9, 2011

Rainbow Rice

Rainbow Rice


One of the many fun, and educational, DIY projects that's floating around is home made rainbow rice! I love this stuff! It is great to put in a sensory bin or table for your toddler or preschooler. It would also be great to use for home decor. I can imagine making some red and green rice to fill a decorative apothecary jar or vase around Christmas time. I could also see using rainbow rice as the bottom support for flower arrangements. No matter what reason you have to make it, I am SURE you will come up with a hundred more! It is simple to make out of common household items. Here are the supplies you need:

rice (2 cups per color)
vinegar or rubbing alcohol (1-2tbs per color)
food coloring (amount varies)
glass jars with lids, or another seal-able container that you don't mind staining
aluminum foil
cookie sheet
conventional oven

Directions:

Preheat your oven to 175 degrees Fahrenheit.

Line a cookie sheet with aluminum fold, making sure that you let a little bit hang over on at least two sides. (This will give you something to grab a hold of later. Don't skip this step or you will have a heck of a time pouring the rice off of the cookie sheet later.) Place the cookie sheet aside.


Put approximately 1-2 tbs of rubbing alcohol or vinegar into a glass jar. Add your desired color and how much food coloring that you find you need. (You may have to experiment a little bit here. Obviously, you will need more food coloring for more saturated colors.) Then add two cups of rice to the jar. Cover or close TIGHTLY, then shake to mix. (You can imagine why the tightly part is important....not a pleasant thing to clean up...)

Once mixed, pour the rice onto the aluminum foiled lined cookie sheet. If you plan on making more colors and mixing them, you can continue to add rice to the cookie sheet. Otherwise, you may want to make each color separately, or on a separate cookie sheet. Be sure that your layer of rice is not too thick. A tick layer will take longer to dry out in the oven.

Place in the oven for approximately 20 min. Check the rice, and bake another 10-15 min if it is still wet. (When I made my rice, I made the layer of rice WAY TO THICK. I ended up having to bake mine much longer than this.) Continue baking and checking the rice as necessary.

Removed the rice from the oven, and let cool. The great thing about this recipe is that the color will not bleed even if the rice gets wet. Unfortunately, my little one has put this in her mouth on more than one occasion and has even managed to drool into it with no ill effects.

Now go have some fun with your rainbow rice!


Side note: I used vinegar with my rice and to this day the rice smells a little bit like vinegar. If your not fond of that smell in particular, I would suggest using rubbing alcohol. I also hear that people have success with just letting it air dry. I was worried about knocking it over accidentally and ending up with a HUGE mess so, I didn't try it.


Rainbow Rice

Ash Tree Meadow


I hope you enjoy my family's little slice of the blogging world! I have much to share, from homeschooling, to crafting, and even a few tutorials here and there! I hope learn a lot a long the way, and just plain share my families journey with the world! Please feel free to leave comments, and constructive criticism. I would love to hear what YOU would like to read more about!

With Warmth,

The Ash Tree Family


Related Posts Plugin for WordPress, Blogger...