Wednesday, October 26, 2011

Tot School: 14.5 Months

Tot School

~14.5 Months~


We had a little distraction while taking our tot school pictures this week. The Stink Bug has a fascination for lawn mowers, especially when they involve one of her favorite neighbors. You will see that she is staring into the distance in some of the pictures....well...this was why!


We did LOTS of puzzle work this week. I love this specific puzzle because all of the fish are the same shape so, no matter where she puts the piece it will fit, even if the color doesn't match.


I also enjoy this puzzle because it has tiny little "stems"/"knobs" or whatever you want to call them. Whatever they are, they are GREAT for fine motor practice.


The second activity that we worked on was a recycled container activity. I used a cleaned out oatmeal container, and cut small holes in it that fit her alphabet blocks. You can see another oatmeal container activity here.


I figured that putting holes in the lid, as well as the side, would challenge her to move her wrist in various ways.


She really enjoyed looking at each side of the blocks before putting it into the container. This was a little bit challenging for her, because I made the holes a tight fit. I imagine that you could do this activity with just about any block you have around!


The third activity that we worked on was a spooning/transferring activity. The Stink Big loved the spoon, love the oatmeal, loved the bowls but, loved them all separately.


She enjoyed "pretend spooning" and eating it. She enjoyed running the oatmeal through her fingers.


I think I will look into giving her some more familiar materials to work with for spooning and transferring. I think I may try to use the rainbow rice, since she is more familiar with it. You can check out my tutorial for rainbow rice here.


Pumpkin Time!


You know what time of year it is! Time for silly, tooth grinned, pumpkins! In the past, I have poured hours into intricate pumpkins with crazy patterns. This year is different. Without much time, and no desire for the stuffy pumpkins of my recent past, I decided to bring back a little of my childhood. I have such good memories of pumpkins carved on a whim, and good times with my family. I really wanted some of that fun again! Why does it need to be a planned out event? On a whim I say! A whim!


Here is daddy teaching the Stink Bug how to carve a pumpkin! She was more interested in trying to eat the pumpkin seeds, and opening and closing the pumpkin lids, than listening to daddy.

Saturday, October 22, 2011

Faith Print Giveaway: Winner


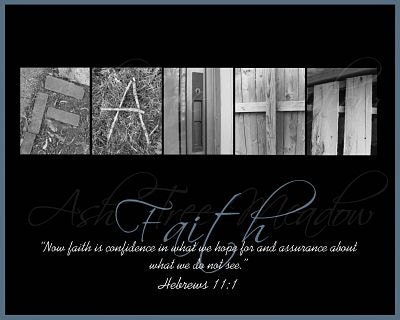
This giveaway was for a pdf copy of my Faith 8x10 print from my Etsy shop Ash Tree Meadow Online.


Faith Print

Alright! The giveaway is closed and I am happy to announce a WINNER!

blogger giveaway winner

Congratulations Jessica (jcwega27)! I will e-mail you shortly! I hope that you enjoy your 8x10 and it helps to strengthen your faith or the faith of whomever receives it!

If you didn't win, keep checking back, I PROMISE that I will have another print giveaway soon!!!

Have a wonderful day!

Ashley

Wednesday, October 19, 2011

Cloth Diaper Blog Post Revisit


Here is an oldie but goodie! I dug it out of the depths of my blog posts! I hope you enjoy learning about how I cloth diaper the Stink Bug. Oh, and yes, this may be old but, this is STILL how I do it!


Monday, October 11, 2010
Cloth Diapering: Stink Bug Style

Even before I became pregnant I thought cloth diapering was a nifty idea. I think my interest stemmed from some experiments that I did in high school. In these experiments, I can remember taking disposable diapers, tearing open the insides, and shaking out the absorbing "crystals" that are impregnated within the interior bleached cotton. From there I messed with the absorbency of the crystals and did some other experiments with the chemical properties that it had. I thought that this was the coolest substance ever! Cool, and very impressive chemically. It kind of made me wonder why it was in a diaper, next to a baby skin all day long.

I also was interested in lessening the garbage I made. I have always tended to steer away from plastic water bottles, soda cans, and those sorts of things in general. That is not to say that I don't EVER use them, I just try to lessen the amount I use. Why would I not try to do this with diapers?

Ok so, I could go on and on about the reasons why but, that is not what this post is about. This is not about selling cloth diapering. It is not the right choice for everyone. This is about telling my experience thus far, and what I used to cloth diaper the Stink Bug for those who are curious.

Before I had her I decided that I would follow other cloth diapering advice and not take cloth diapers to the hospital with me when she was born. This was because I had heard that meconium (the baby's first poop) can stain your diapers and is difficult to wash out. Plus, how in the heck was I going to wash all of those diapers at the hospital? Nope, not going to do it. Not worth it to me. Not to mention, the hospital provides them, and they are "free." (well free right then...)

It was a good decision, and a decision that I continued with after I got home due to my "difficult" recovery. I was not in any shape to do laundry and quite frankly, that was the last thing on my mind. Then, we ended up at Childrens hospital, and I was not going to take cloth there either. Another good choice.

So, after things had calmed down some, we made the switch. Now, I am not going to lie. We did not do it cold turkey. We switched over to cloth diapers and cloth wipes during the day, and disposables at night. Some of this decision was based on the fact that hubby has night diaper duty, and we try not to turn on any bright lights at night to help make going back to sleep easier. We did this just until we had run out of the disposables that we had. I would say about two weeks.

Once we ran out, that was that. With hubby having been laid off, there was no way I wanted to continue to spend precious money on things that were going to be thrown away. Diapers are crazy expensive. Especially when your baby is little and using 15 a day.

On to the diapers we use!!!We use a variety of new, used and homemade.

Diapers:

We mainly use a bunch of used (and a few new) Bum Genius "one size fits all" diapers that have absorbent inserts, velcro tabs, and snaps in the rise (to change the rise size). We like these because we find them to be the most like disposables in ease of use. We have a few other random brands that are used, and similar to the Bum Genius. I also have a bunch of homemade diapers that I sewed to be similar to the Bum Genius diapers. They do not have snaps though, just velcro. Then, we have three one size Thirsty diaper covers, and about 12 or so prefold inserts to go in them. I use some Snappies with the Thirsty covers occasionally but, I don't find them necessary. My hubby wont use the prefolds and covers since they involve a bit more work, I don't blaime him. It is easier to grab an all-in-one.


Wipes:

The wipes we use are all homemade. I sewed an 8x8 square (the size of a disposable wipe) made out of one layer of cotton flannel and one layer of microfiber. I stitched them wrong sides together, turned them and top stitched. I think we have around 40-50 of them. Enough to have at least one or two with every diaper.

When we first brought the Stink Bug home from the hospital we did not use disposable wipes. We took a paper towel roll, sawed it in half with a bread knife, and used a little plain with with each square. Very cheap, and no chemicals.

Now that we use cloth wipes, we don't just use water like we did with the paper towel wipes. We use a spray bottle of water with a Baby Bit in it. Baby Bits are small squares of mild glycerin soap made with olive oil infused with plantain and chickweed herbs to help clear skin irritations. Tea tree oil is added for its antifungal and antibacterial properties, keeping wipes water clean. Relaxing lavender essential oil calms your baby and gives your nursery a floral scent. (Yeah, I took that from their web site. You can find them here: --> http://www.soapsbydenise.com/babybits.htm). We LOOOOOOOVE them. The nursery really does smell great! They smell much better than the disposables. They also make the diaper laundry smell nice. Oh and since we have been using them, and the cloth diapers, the Stink Bug has not had any diaper rash whatsoever.

Laundry:

Speaking of diaper laundry, I know you are probably wondering how it is done around my house! Back in the day, moms used to rinse diapers in toilets and use "wet" diaper pails. They would have to haul a big bucket of nasty diapers steeping in gross water to their washing machine. My mom has memories of trying not to dump the water on the way, or gag in the process. Empty the water out....ugh. This is not what we do. If I had to do it this way I probably would not cloth diaper. EVER.

This is how I do it. Right, or wrong, it works for us. I am also going to be honest here. I am lazy. I don't want to have to do any more work than I have to so, this is the easiest process that I could come up with. (Note: This is for all-in-ones, not prefolds. Prefolds are this easy though.)

Step one: The baby.
Take diaper off of baby (with new diaper underneath).
Pull out absorbent insert and throw both into diaper laundry bag (a fabric bag made with PUL).(Update: Now that she eats "people food" we have to dump the contents in the toilet. Easy.)
Use spray bottle of water and Baby bits to get a wipe wet.
Wipe baby.
Throw wipe into diaper laundry bag.
Velro new diaper on baby.
Done.

Step two: The laundry.
Take diaper laundry bag to washing machine.
Open and dump diapers into washer, along with the bag itself. (I am not touching the diapers...YUCK!)
Rinse on cold with no detergent.
Wash on hot with a scoop of Allens detergent. Set machine to rinse in cold and extra rinse in cold.
Move to dryer.
Dry.

Step three: Folding.
Take diapers, inserts and bag out of the dryer.
Stick nose in diapers and inhale clean smell (optional).
Stuff inserts back in and "fold" (I recruit hubby here).
Done.

Repeat.

Easy.

Monday, October 17, 2011

Tot School: 14 Months

Tot School

~14 Months~


This week we worked on three activities, as usual! The first activity that we worked on was a fine motor activity. I pulled out the small colander for yet another go at it. This time we used pipe cleaners instead of toothpicks. I figured that they would be a bit gentler if she put them in her ears. Thankfully, she didn't make the connection this time!


This activity was a bit too easy but, she still really enjoyed it. She also enjoyed pulling the pipe cleaner back in forth in the holes while listening to the nice "scratching" sound that it made.


Look at that concentration! I love it!


The second activity we worked on was a pouring activity. I did not have high expectations but BINGO it was perfect! Just challenging enough for me to have to do plenty of modeling but, no so difficult that she couldn't do it by herself. Yay! I was glad to finally have great activity right at the cusp of her "sweet spot" for learning. You can expect to see a pouring activity each week now!


At first she wanted to play with the rainbow rice that I had in the glass measuring cups. (Check out my tutorial for rainbow rice here.)


But she got the hang of pouring it too! She even stuck her hand in the rice as she was pouring it! (Sooooo glad we did this one outside!)


The last activity that we worked on was sign language related. Not your typically tot tray type of activity but, something to take signing to a new level for us. The Stink Bug can sign 30+ words so, I needed to do something a little bit more challenging with her knowledge.


I pulled out a ring of cards that we use for identifying and laid it out for her on her tray. Normally I would hold up two cards and ask her to choose/point to one of them. For example, "Please point to the apple." This time I asked her, "What is that?" as she looked at the cards. I also asked her, "What is the sign for that?" She happily signed back what each card was. Sometimes I had to be more direct and ask her, "That is a puppy. How do you sign puppy?"


We both liked this activity and I may even stick these in my purse or her diaper bag for those times that we are out and need a quiet activity. You know, those times like standing in line at the grocery store....when all your toddler wants to do is grab at the bananas and fuss about having been in the cart too long? We all need activities for times like those! What types of activities do you do with your toddler during those times? I would love to have a few more tricks up my sleeve!


Oh, and before I forget! Don't forget to enter my giveaway to win an 8x10! You get get there by clicking here!

Toddler Menu

Toddler Menu

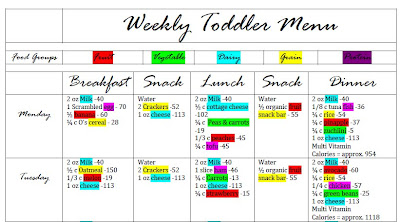
After creating a menu plan for my Sting Bug (to make sure she was getting enough calories in a day), I figured why not share the love!? Many of the toddler menus on the web really don't jive with my ideals for what a toddler should and shouldn't eat. For an example, I think is it fine for a toddler to enjoy a pancake on occasion (read once a month), but I do not think it is ok for this to be a staple breakfast food. I also feel this way about cookies, and other super sweet treats. I am not fond of very processes food either so, you will see that this menu reflects those ideas. Oh, and we are not big red meat eaters so, you wont see much of that! You can of course swap out what your family eats! Oh and for those curious sorts, yes, this is REALLY what my toddler eats!


Toddler Menu

Features:

~Color coded food groups
~Calorie count for each food and at the end of each day
~Two snacks and three meals per day
~Variety from day to day
~Serving sizes

Toddler Menu

I also need to point out a few things that make this menu specific to my Stink Bug:

Calories: Approximately 1,000 per day. I am not a doctor, this is just what I find that the Stink Bug tends to eat, and is right about what the American Pediatric Association recommends for her age. Ask yours if your not sure what your little one needs!

Milk: You will notice that there really is not much milk on this menu. This is for no other reason that the Stink Bug just does not drink much milk. I will allow her as much as she likes all through the day but, even two ounces at a meal is a stretch for her. Obviously, your child may drink more. I try to add lots of cheeses to balance this, you will see this throughout the menu.

Juice: Juice is another of the those "treat" items in our home. I find that other than the fortified vitamins (which the Stink Bug gets in a multivitamin), juice really isn't that great. It mostly has a whole bunch of sugar and empty calories that can fill up a little belly and keep it from eating more healthy choices! Juice can be a good option if you have been playing out in the yard and need a great way to hydrate a child who doesn't like water though!

Peanut Butter: You wont see any peanut butter or shellfish on this menu. Simply because we have not introduced them to her yet! I am sure we wont wait much longer to give her peanut butter though.

Here is a link to download a pdf file of my Toddler Menu. I will do my best to post a blank menu for you to upload ASAP!

Download the Toddler Menu here! (You may have to X a pop up wanting you to do something first. I am sorry, if/when I can find a better downloading site I will switch to it. Any suggestions?)

Does your family have a "set" menu when it comes time to feeding your toddler? Do you have any tips, or tricks that you would like to share!? I would love to hear about them!


Oh, and before I forget! Don't forget to enter my giveaway to win an 8x10! You get get there by clicking here!

Thursday, October 13, 2011

Getting to know me!


So, I realize that this post is long over due but, better late than never right!?

I am a mom to one little Stink Bug, or so I lovingly call her on this blog! I hope that she is not the only Stink Bug in my future but, only God knows that for sure! I am married to a wonderful man who is a jack of all trades. (Who would say that their husband was NOT wonderful on their blog anyways? Who knows, he might READ this post! Just teasing! He is a sweety!) He is currently going back to school to get a degree in A&P.

I have earned my BSEd and my MEd which really only matters when I say that I have only one student right now who is a priority in my life. That is my precious little girl. I have always wanted to be a mommy first and foremost, and a teacher second. I feel like starting down the homeschooling path with her is letting me enjoy both worlds. I am not sure how long I will homeschool but for now, my husband and I have made a commitment to homeschool her through kindergarten and will reevaluate then!

Why are we choosing to homeschool you might ask? Well I believe that that question deserves its own post! I will link to it here once it is posted!

I really love to sew, as I am finding more and more mamas do too! For a long time I thought that it was a silly hobby for a girl in 20's to have and that I was just an old fuddy duddy. Well, that is no longer the case! Over the last few years the blogging world has really opened my eyes to all that sewing is, and can be. Many of my projects have morphed from more "traditional" sewing projects, like store bought patterned baby blankets and aprons into upcycled, imaginative, and exciting projects! I still love and adore patterns, don't get me wrong. I just get a kick out of crafting something on the fly!

My husband and I are currently getting our home ready to be put on the market to sell. Grubby fingernails, and painted hair, seem to be a normality around here. I don't see much of an end in sight either. We are trying to buy a foreclosed home which will require a bit of elbow grease and then some! I am sure there will be future posts about the mess we are sure to find ourselves in!


Stick around for the mess and enjoy the Ash Tree Meadow!

Ashley

I hope you will stay connected, by becoming a follower, subscribing in a reader, subscribing via e-mail, or following me on Twitter!

Tuesday, October 11, 2011

Montessori Environment 1-2 years


Confused about which activities to work on with your toddler? Dailymontessori.com has some great resources to help you choose activities that are appropriate and are in your child's "sweet spot" of learning! Here is a little bit from their 12-24 month section. You can check out the information directly by going here!


Montessori Environment 1-2 years

"At this point children are able to grasp things and their eye hand coordination develops more. Give your child one or two piece wooden puzzles. Do not give them things that are too difficult, give them things that they can accomplish with a bit of trying/effort. Give them as wells rings of different sizes that need to be placed on a rocking base according to size.

Wooden blocks are always good. At first they will just enjoy watching you build them and knocking them down. It will be a bit later that they will be stacking them up higher and higher. The blocks need to be just cubes but other shapes as well to allow for creativity.

Give your child a crayon and paper. Have a small tray in which the child can contain their paper in and a small cup with a big crayon or block crayon for easy handling. This will also make the clean up easier if they draw out of the paper. Have the background of the tray in a dark color so they can see the contrast from the paper. As a progression you can give other mediums such as thick toxic free markers, and colored pencils. Show how to properly grip pens and focus drawing only on paper.

Drop boxes using balls or various shapes as it practices their grasp and intentional release to put things in. Have a dowel with a stable base and have things around the house that are rings, such as bangles and napkin rings for variety.

A child at this stage loves inserting things into things. The best for them would be a real key with a lock that is relevant in a room. Cabinet locks and others. This will also motivate the child to be able to stand up with support/leaning on the cabinet to reach the lock. One will always be surprised at the determination a child will show to be able to get this activity right.

As your child becomes more adept with using their hands give the child a basket or box of things that can be opened and closed. This can be small zip bag, a container with studs, Velcro and snaps. As an added challenge when the child gets older add small screw tops bottles from old discarded plastic bottles/containers."

Montessori 3 Period Lesson

"Maria Montessori had a method to teach vocabulary to children; she called it The 3 period lesson. This is best done with real objects, for example have 3 types of fruit in season, vegetables, clothing or utensils. Other can be realistic objects (miniatures of animals) that can be found in any toy shop. Have a mat on the floor to lay out he objects on, or sit with the child at their table. One may put these objects on a tray or basket for easy handling.

Fist period is the introduction of the object. Show the object to the child and say” This is a (name of the object)”. Then lay it on the mat or let the child touch and hold it, even smell it if possible, then repeat the name of the object. Repeat the process with the other objects. By allowing the child to feel and smell the object it makes a more concrete memory for them.

Second period is to ask the child to point to the object that you have named. “Can you point to me the (name of the object)?” Then move the object to another place so you know the child remembers the name and not the placement of the object. This period makes the lesson more alive and interesting. You may also ask the child to move the objects to different spots on the mat.

This stage can be extended for under 3’s by asking the children to place the object that you have named ( another way of identifying if they know the name of the object) to a different area of the mat, or removing or putting it in the basket, or handing it to you. You can incorporate vocabulary words for placement such as ‘first’, ‘in front’, ‘behind’, ‘at the back’, etc.

Third period is to ask the child to name the object as you point to it. This is mostly done with older children who can fluently talk.

The number of items may be increased depending on the challenge your child needs."

Monday, October 10, 2011

Tot School: 14 Months

Tot School

~14 months~


Hello again! I have officially begun to enjoy fall for the year! Up until now it seemed that the weather was not sure which way it was going. Back to summer, or right into winter. This week the trees in our yard have begun to drop their leaves and have made for a beautiful fall backdrop. I love it! (I also can't wait for the mosquitos in our yard to be gone as well. The Stink Bug has a nice little bite on her cheek!)

Oh, and of course, the Stink Bug loves it too! If you have been following along with my Tot School posts that you know that she has an affinity for leaves, and twigs. She is positively beside herself when we go outside to play. Which, I might add, is twice a day now. Whenever we are in she hangs out by the door going outside and repeats "out-t" incessantly. She has even got to the point of bringing me shoes, or a jacket (or what she thinks is a jacket) and pointing to the door. So cute! Except when it is 6 am, and mommy is in her pajamas still. I am sure our neighbors would have a fright! ;-)


Ok, on to what we did for Tot School this week!

The first activity was more for "fun" and the fact that she has been carrying her pumpkin all around the yard. I used a pumpkin with an extra long stem, and let her stack rings of all sorts on it. Here, she is stacking some ring links.


The second activity that we worked on this week was a continuation of what we did last week with the q-tips. (You can check that out here.) I gave her a small colander, turned upside down, and a handful of toothpicks. I had planned this activity to be more difficult for her but, it also turned out to be too easy. I was sorely disappointed.


She really enjoyed it until.....well....if you remember last week she had q-tips. She remembered the q-tips, which she stuck in her ears. Yeah, you guessed it. She stuck the toothpick in her ear. I promptly grabbed the toothpick and moved on to the next activity. The last thing I wanted was for her to puncture her eardrum. Lol! What a silly kid!


The last activity that we worked on was another 1 to 1 activity. I gave her an ice cube tray with enough small ghost erasers (thank you Target dollar section) to have one for each space. I did not expect her to be able to put the ghosts one in each place but, I gave her the benefit of the doubt.


She really enjoyed playing with the little ghosts (carrying them around) and putting them in the ice cube tray, and back out again but, she was not interested in putting them in one by one. That was fine with me!


This picture is my favorite shot of her from the week. She is wearing a "Little Red Riding Hood" cape that I made her for Halloween and the winter months. Originally, I wanted to continue with her Zebra outfit (you can see it here) but, when I went back to get more of that fabric, I realized that my fabric store had closed! (Pout, pout, pout.) So, I figured that this is just as good and she enjoyed wearing it to boot! :-) What will your toddler be this year for Halloween? I would love to know!

Oh, and don't forget to enter my giveaway here! See you next week!

Friday, October 7, 2011

Faith Print Giveaway!


Giveaway Details: One winner will receive a pdf copy of my Faith 8x10 print from my Etsy shop Ash Tree Meadow Online.


Faith Print

This giveaway is CLOSED!

To enter for a chance to win, simply comment on this post! You may comment as frequently as once per day through Friday, October 21 by 11:59 pm EST. You can ALSO do any of the following to increase your chances of winning:

* Become a follower of my blog!
* Tweet about this giveaway
* Follow @AshTreeOnline on Twitter
* Post about this giveaway on Facebook or on you own blog!


Make sure to come back and leave a separate comment for EACH action you take. Please include links to your posts, tweets etc. when possible. Good luck!

You know what, I want to sweeten the deal! If I have MORE than 50 separate comments on this giveaway, I will mail you an 8x10 print instead of just the pdf! Feel free to share this giveaway with whomever you like to increase the number of comments! This would make a great Christmas gift too! Good luck!


*Email addresses in comments will ONLY be used to contact the winner. They will not be shared with the public or used for promotional purposes. The winner will be announced on Saturday, October 22.

Wednesday, October 5, 2011

Giveaways!


I just wanted to give you all a little heads up on a giveaway that I will be posting soon! Feel free to follow me to catch it as soon as it is posted! You can follow me by clinking the "join this site" button on the right side of my blog!

I will give you a hint... The giveaway will be from my Etsy shop! You can check it out here and try to guess what I will be giving away! You can also get to my Etsy shop from the left bar side of my blog!

Ashley

Tuesday, October 4, 2011

Tot School: 13.5 mo

Tot School

~13.5 months~


Hi everyone! I am sorry that it took me a little bit longer to make my tot school post this week! We are in the middle of fixing up our house to sell and the last few weeks have been crazy! New paint, shutters, landscaping, mailbox, concrete.... you get the idea! I will make a post about the changes we have been working on before long!

This week we worked on three different tot trays, as usual. The first tray that we worked on had 3 or 4 different containers with lids. We worked on taking the lids off and putting them on. All but one were circular, to make it a bit easier to put them on. The Stink Bug definitely had the most difficult time with the rectangular lid. She just wasn't sure how to turn it!


The second activity that we worked on was putting q-tips into a cleaned out parmesan cheese container. This is a great activity for fine motor skills. Especially if you have your tot put the q-tips into the small holes. This activity was almost too easy for the Stink Bug. She was able to complete it quickly so, I gave her more q-tips and let her repeat it as many times as she liked. Which was many! Next week, I may re-create this activity with smaller holes.... Oh, just be careful to watch them with the q-tips! The Stink Bug knows that they are for your ears and would often stink them in hers....which worried me that she would go cramming them in her ear too far! Ouch.


The last activity was a bust. I knew that it probably would be but, I wanted to try it anyways. I knew that the Stink Bug would not understand 1 to 1 but, I thought that she might get me modeling it for her. Not so. In this activity I gave her an ice cube tray (for water bottle ice cubes) and enough crayons to have one for each spot. I showed her how to put one in each place, until each spot was filled. She put the crayons in, but did not care which spot she put them in.


Really, she got more enjoyment out of taking them out, after I put them in. That ended up being ok with me because, they weren't very easy to take out. She had to take them out at the pointy end of the crayon. Not what I planned but, still a good activity!


The Stink Bug did LOTS of gross motor play this week as well. She is able to climb, and slide, without my help now. Although, I wont let her slide without my arms right under her. This picture is as far as I will let her climb before I am right there, arms ready! Can't trust a toddler!


As usual, leaves and grass were involved!

Related Posts Plugin for WordPress, Blogger...